In This Article 5 min read
Key Takeaways
Virtual staging used to be a single-product decision: either you paid a virtual stager $30–$80 per photo to add furniture digitally, or you didn’t stage at all. In 2026, real estate teams have three real choices — physical staging, photo-based virtual staging, and 3D virtual staging — and the right answer depends on the listing price point, the property type, and how fast you need it. This post breaks down each option with real costs, real outcomes, and how to pick.
If you’re a real estate team running scale virtual staging, our 3D rendering and virtual staging VA service places dedicated Filipino specialists who handle the entire workflow end-to-end. For the broader rendering decision framework, see our 3D rendering buyer’s guide.
The Three Virtual Staging Options
Option 1: Physical staging. A staging company brings actual furniture into the property, sets it up for photography, and removes it. Cost: $1,500–$5,000+ per property for 30 days. Pros: tactile, walkable for in-person showings. Cons: expensive, slow, only works for vacant or empty properties, doesn’t scale.
Option 2: Photo-based virtual staging. A 2D specialist uses Photoshop to add furniture, decor, and accessories on top of existing real estate photos. Cost: $30–$80 per image. Pros: fast (24–48 hour turnaround), cheap, no physical access needed. Cons: limited angle and lighting flexibility — you can only stage what’s already in the photo.
Option 3: 3D virtual staging. A 3D specialist builds a model of the empty room (from floor plans, photos, or laser scans), populates it with photorealistic furniture, and renders the room from any angle in any lighting. Cost: $200–$800 per room with a freelancer; $1,500–$2,500/month for a dedicated specialist producing 30+ rooms. Pros: any angle, any time of day, any furniture style, any layout variation. Cons: higher per-image cost than photo staging, longer initial setup.
Which Option Fits Which Listing
Sub-$500K listings: Photo-based virtual staging. Cost-per-listing matters more than visual sophistication, and most buyers in this segment are scrolling Zillow on mobile — they won’t notice the difference between photo staging and 3D staging.
$500K–$2M listings: Photo virtual staging or selective 3D for hero shots. Worth investing in a 3D living room and primary bedroom if the listing is competing on visual presentation.
$2M+ luxury listings: 3D virtual staging across all rooms. At this price point, the listing photography itself is a marketing asset — buyers expect magazine-quality presentation. Photo staging starts to look amateur next to true 3D.
Pre-construction / off-the-plan units: 3D virtual staging is the only option. There is no physical space to photograph yet. The renders you produce here are also the listing photos that sell the unit before walls go up.
Renovation / flip projects: 3D virtual staging during the renovation window. Show buyers the finished product before you’ve finished the renovation — accelerates the sales timeline by 30–60 days in most markets.
STR (Airbnb / VRBO) hosts running renovations: 3D virtual staging to test furniture layouts before you spend on actual furniture. Saves the cost of returning expensive pieces that didn’t fit the space.
The Volume Math
Real estate teams that scale virtual staging fall into a clear pattern. At low volume (1–5 listings/month), per-image pricing wins. At high volume (15+ listings/month), dedicated specialist pricing wins by a wide margin.
Take a real estate brokerage averaging 20 listings per month with 6 staged photos per listing = 120 staged images per month:
| Model | Monthly Cost | Per Image |
|---|---|---|
| Photo virtual staging at $50/image | $6,000 | $50 |
| 3D freelance per-room at $400/room | $48,000 | $400 |
| Dedicated 3D specialist (160 hrs/mo) | $2,000 | $16 |
At this volume, a dedicated specialist is 3x cheaper than photo staging AND produces 3D output (any angle, any lighting). The math collapses in favor of dedicated capacity once you cross ~50 staged images per month.
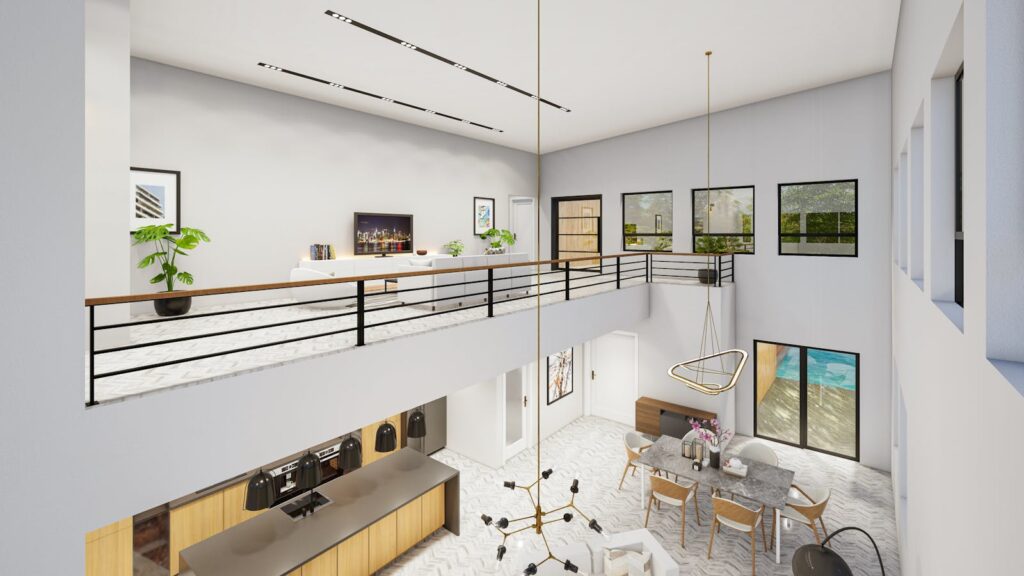
What Modern 3D Virtual Staging Actually Looks Like
Three things separate amateur 3D staging from professional output:
1. Furniture libraries. Pro 3D specialists work from curated furniture libraries (often 5,000+ photoreal models including Chaos Cosmos, V-Ray Material Library, and custom-built collections). Amateur work uses generic SketchUp 3D Warehouse models that look like SketchUp 3D Warehouse models.
2. Lighting. Professional 3D staging matches the lighting of the original photo (window direction, time of day, overcast vs sunny). Amateur output ignores this and produces renders with sun coming from impossible angles.
3. Material accuracy. Pro specialists use HDRI lighting, V-Ray or Corona material libraries, and post-production in Photoshop to match the texture and contrast of the original photo. The result is indistinguishable from the original photograph except that there’s now furniture in the room.
The professional standards are documented across the industry — sites like CGarchitect and Ronen Bekerman publish ongoing tutorials and quality benchmarks for the architectural visualization community.
The Workflow for Real Estate Teams
If you’re running a real estate brokerage or property marketing team, the workflow that scales:
Day 1: Set up a shared Google Drive with: property photos (or 3D scan / laser scan if available), floor plans, listing brief (target buyer, style direction, must-include features), and 5–10 example renders for style reference.
Daily: Drop new listings into the folder. Specialist confirms scope and turnaround (24–48 hours for furnished living room, 36–72 hours for full property).
Per listing: Specialist delivers 6–10 staged images per property, plus alternative furniture style versions if the agent wants to A/B test for the buyer demographic.
Weekly: 15-minute review of the week’s deliverables, style adjustments, new furniture library additions for emerging trends.
Common Mistakes Real Estate Teams Make
Mistake 1: Treating virtual staging as a marketing afterthought. The listings that sell fastest treat virtual staging as core marketing infrastructure, not a “nice to have.” Budget accordingly.
Mistake 2: Mixing photo staging and 3D staging in the same listing. Buyers notice the inconsistency. Pick one approach per listing.
Mistake 3: Over-staging. Virtual staging works best when it shows scale and possibility. Over-cluttering rooms with maximalist furniture sets the wrong expectation. Less is more.
Mistake 4: Ignoring MLS rules. Some MLS systems require disclosure that photos are virtually staged. Most also require the original empty-room photo to be included in the listing alongside the staged version. Know your local rules.
Mistake 5: Not testing furniture style for the target buyer. A modern minimalist couch sells to one demographic. A traditional sectional with throw pillows sells to another. Match the staging style to the listing’s likely buyer.
Getting Started With 3D Virtual Staging at Scale
If your team produces 15+ staged listings per month and the per-image freelancer cost is starting to add up, our 3D rendering and virtual staging service places dedicated Filipino specialists with full SketchUp + V-Ray production stacks, curated furniture libraries, and 24–48 hour turnarounds. Most brokerages hit 8–10x cost savings vs per-image pricing within 30 days.
Need a VA who already understands your industry?
We don’t place generalists. Our VAs are matched and trained for the specific workflows of your sector.
See industry VAs →